A few months ago, I decided to try fermenting a lager for the first time in my (still relatively) newly acquired kegerator. Having bought one big enough to accommodate a full half barrel, a standard 5 gallon fermenter and a corny keg fit inside of the fridge just fine.
After the two months or so of fermentation and conditioning it took to actually brew the Czech -style Pilsner, I decided to try naturally carbonating the resulting beer instead of using C02 to force carbonate it. (After months, what's another week for the yeast to do their thing again?) Although I was tempted to try using some preserved, un-fermented wort instead of priming sugar, I got lazy and just opted to use priming sugar. As per usual, I followed Charlie Papazian's advice and used 1/3 of a cup instead of the normal amount you'd use to prime 5 gallons for bottling
I'd say that there is a noticeable difference in the end result. There's a bit less head when pouring the beer, and that which does form takes more time to develop. (Similar to what you'd see on a higher-gravity, higher viscosity commercial brew or on a keg-conditioned beer served at your local brewhouse.) The mouthfeel is definitely more delicate and you get bubbles that are somewhat akin to those you see in a properly poured glass of champaign.
All in all, it's worth the extra week or so to naturally condition the keg. I think I may just have to go for the gyle method next time.
As an aside - if you've got the capability to brew lagers, do it. It may have just been beginner's luck, but this is hands-down the best brew I've produced so far.
Showing posts with label cornelius keg. Show all posts
Showing posts with label cornelius keg. Show all posts
Thursday, January 10, 2008


Wednesday, December 19, 2007
Oh You Evil C02 Distributor
In a moment of zeal about a month after I'd completed my kegerator conversion and actually had more than one Cornelius keg of brew up, I ordered a 2 port CO2 distributor (K242) and foam-free tubing kit (KX05) from Northern Brewer.
About a week later, I got a chance to install them both into the kegerator so it was possible to run two kegs at the same time, albeit only one through the faucet. (It's easier to keep the good stuff hidden from the room-mates that way.) However, I noticed that after I'd made these changes, even with both valves on the CO2 distributor closed, there was still a faint hissing from the CO2 regulator. So I got in the habit of just shutting the main valve on the regulator off as a precaution.
Fast forward to this past Saturday...
I'd kegged up my Czech Pilsner over the week and added some priming sugar to carbonate it. Unfortunately, I was starting to get a bit antsy to drink the brew since all of the tastings along the way had been very promising. So in my impatience, I dialed up the pressure on the CO2 regulator and left it to force-carbonate overnight.
And by the time I woke up on Sunday, all of the CO2 in my 5lb. tank had escaped. (In hindsight, this seems even dumber than it seemed at the time.)
So, I'll be posting a review about how well the commercial leak-detector stuff works at some point this weekend...
About a week later, I got a chance to install them both into the kegerator so it was possible to run two kegs at the same time, albeit only one through the faucet. (It's easier to keep the good stuff hidden from the room-mates that way.) However, I noticed that after I'd made these changes, even with both valves on the CO2 distributor closed, there was still a faint hissing from the CO2 regulator. So I got in the habit of just shutting the main valve on the regulator off as a precaution.
Fast forward to this past Saturday...
I'd kegged up my Czech Pilsner over the week and added some priming sugar to carbonate it. Unfortunately, I was starting to get a bit antsy to drink the brew since all of the tastings along the way had been very promising. So in my impatience, I dialed up the pressure on the CO2 regulator and left it to force-carbonate overnight.
And by the time I woke up on Sunday, all of the CO2 in my 5lb. tank had escaped. (In hindsight, this seems even dumber than it seemed at the time.)
So, I'll be posting a review about how well the commercial leak-detector stuff works at some point this weekend...
Saturday, September 22, 2007
Force Carbonating Homebrew
2011-10-17 Update
In the four years since I originally published this post, my methods have gotten a tad more *ahem* sophisticated. There's actually a proper way to carbonate your brew which will result in the desired level of CO2 for the particular style you've brewed.
First, you'll want to find the desired level of CO2 for the style you've just painstakingly brewed. Here are some general guidelines and a helpful calculator. After you've racked into your sanitized and pressure-tested keg, hook up the CO2 disconnect and dial the pressure on your regulator to the one indicated on the calculator. Leave the keg on the CO2 for 24-48 hours, gently rocking it back and forth occasionally if you're inclined to speed the process up a bit. Bleed the pressure in your keg and dial it back down to your dispensing pressure.
The method I recommended below can still work in a pinch, but there's a good chance you'll decrease the head retention of your beer by using it.
*(In case you were wondering why temperature matters, CO2 and all gasses are more soluble in liquids when they're at a lower temperature. To get really nerdy: the molecules in a liquid move around faster at higher temperature. This motion is the result of increased kinetic energy and is sufficient to break the weak bonds holding that gas in solution.)
Original Post:
So as I previously mentioned, one of the things that ultimately pushed me over the edge into procuring a kegerator was the fact that I had a batch of double IPA which failed to carbonate itself when bottled. (I had so much time invested in this brew that I couldn't bear to let it go to waste.)
Naturally, the first thing that I did once I'd completed the kegerator conversion was to force-carbonate the double IPA. And seeing as I'd already waited a really long time to try this beer, I opted for the "High Pressure and Brute Force" methodology of carbonation. In other words:
Next time I'll probably opt for natural carbonation in the cornelius keg (a la bottle conditioning) or for the "Low and Slow" method of applying dispensing pressure over about a week or two.
In the four years since I originally published this post, my methods have gotten a tad more *ahem* sophisticated. There's actually a proper way to carbonate your brew which will result in the desired level of CO2 for the particular style you've brewed.
First, you'll want to find the desired level of CO2 for the style you've just painstakingly brewed. Here are some general guidelines and a helpful calculator. After you've racked into your sanitized and pressure-tested keg, hook up the CO2 disconnect and dial the pressure on your regulator to the one indicated on the calculator. Leave the keg on the CO2 for 24-48 hours, gently rocking it back and forth occasionally if you're inclined to speed the process up a bit. Bleed the pressure in your keg and dial it back down to your dispensing pressure.
The method I recommended below can still work in a pinch, but there's a good chance you'll decrease the head retention of your beer by using it.
*(In case you were wondering why temperature matters, CO2 and all gasses are more soluble in liquids when they're at a lower temperature. To get really nerdy: the molecules in a liquid move around faster at higher temperature. This motion is the result of increased kinetic energy and is sufficient to break the weak bonds holding that gas in solution.)
Original Post:
So as I previously mentioned, one of the things that ultimately pushed me over the edge into procuring a kegerator was the fact that I had a batch of double IPA which failed to carbonate itself when bottled. (I had so much time invested in this brew that I couldn't bear to let it go to waste.)
Naturally, the first thing that I did once I'd completed the kegerator conversion was to force-carbonate the double IPA. And seeing as I'd already waited a really long time to try this beer, I opted for the "High Pressure and Brute Force" methodology of carbonation. In other words:
- chill the beer
- apply about 20-30 psi to the cornelius keg with only the gas disconnect attached
- shake the crap out of the keg
- put back in the fridge
- repeat a few times
Next time I'll probably opt for natural carbonation in the cornelius keg (a la bottle conditioning) or for the "Low and Slow" method of applying dispensing pressure over about a week or two.
Thursday, September 20, 2007
How I converted a Danby DKC645BLS to work with both Cornelius and Sankey kegs
The parts I needed to complete my kegerator arrived last night and I wasted very little time before getting down to work. (I've had a batch of Imperial IPA which failed to produce any natural carbonation during bottle conditioning which I wanted to have on tap for the Bears game this Sunday.)
Thankfully, after doing my research, it turned out to be a relatively quick project to modify the stock equipment which comes with the Danby so it'll easily switch back and forth between Cornelius and Sankey kegs.
Here's the parts list (with part numbers from Northern Brewer - no commercial affiliation - I've just had great luck with them.)
3/15/2012 Update: They're now selling everything in a single kit!
Thankfully, after doing my research, it turned out to be a relatively quick project to modify the stock equipment which comes with the Danby so it'll easily switch back and forth between Cornelius and Sankey kegs.
Here's the parts list (with part numbers from Northern Brewer - no commercial affiliation - I've just had great luck with them.)
3/15/2012 Update: They're now selling everything in a single kit!
| 1x | Ball Lock 1/4" MFL Gas Disconnect | [K010] |
| 1x | Ball Lock 1/4" MFL Liquid Disconnect | [K011] |
| 1x | 5/16" Barbed Swivel Nut | [K163] |
| 1x | 1/4" Barbed Swivel Nut | [K123] |
| 2x | Tail Piece 1/4" MFL | [K027] |
| 3x | SS Worm Gear Clamp | [K124] |
| 1x | Teflon Tape | [K089] |
| 1x | Petrol Gel Lubricant | [K031] |
| Optional / Unused | ||
| 15x | 5/16" Beverage Tubing | [K201] |
| (To move CO2 tank off of the fridge) | ||
| 2x | Neoprene Beer Washers | [K030] |
| 1x | Gas Leak Detector | [K224] |
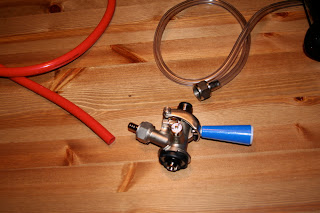
- Let's take a look at exactly what came with the kit. The CO2 cylinder and regulator will work as provided. However, the adapters on the Sankey tap and the adapter on the beer line which feeds the tower need to be changed.
- Cut the line coming out of the tower just after the permanent tubing clamp which attaches to the Sankey tap, preserving as much of the original line as possible. Fit that line with both a hose clamp [slide on to the tubing before shoving the barb in] and the 1/4" barbed disconnect.
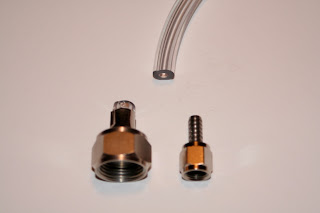
- Similarly, we'll put a hose clamp on either end of the gas line, attach one end to CO2 regulator and the other to the 5/16" barbed disconnect. Be sure to tighten the hose clamps as tightly as you can without breaking them.
- Next up, we'll modify the Sankey Tap to work with the new smaller disconnects. Here's a before picture of the tap. You can see that both the gas and liquid sides use standard beer nuts.
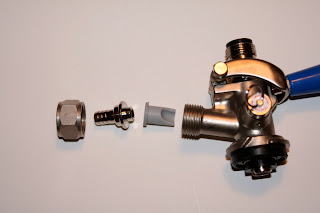
- So, we'll use the beer nuts which came with the tap and just swap out the fittings for the two 1/4" MFL tail pieces. I ordered the neoprene washers to fit between the tap and the tail pieces, but it didn't appear necessary to use them. Here's an exploded picture of the tap before re-assembly.

- That's it as far as surgery goes, so all you have to do now is decide whether you're going to drink a commercial keg or a homebrew keg. Be sure to wrap the 1/4" MFL fittings on either the Cornelius disconnects or on either end of the Sankey tap with teflon tape or use the two flared nylon washers when attaching a keg.
- Here's a picture of the conversion with disconnects side by side:

- Drink some beer!


Sunday, September 16, 2007
Kegerator [part 1]
I finally made the plunge into the world of draft beer at home today. I'm now the proud new owner of a Danby half barrel kegerator. (It was a bit of a saga to actually get the damn thing since I drive a very small car, all of my room-mates drive smaller cars and my parents, whose truck I ultimately used to transport said kegerator, have a habit of leaving town whenever I actually had the free time to go pick this thing up.)
It actually took a while for me to decide exactly which approach (buy and convert or build your own) to take on this endeavor, but it ultimately made sense to go with a commercial model for a couple of reasons. Firstly, it's really not all that cheap to build one yourself unless you start with a cheapo fridge or freezer. (i.e. garage sale / craigslist type material.) Secondly, the commercial guys come with the Sankey tap as an added bonus. Lastly, I was able to get a significant discount on the Danby :)
The next dilemma was how to actually set the thing up so I run Cornelius kegs the majority of the time, but could still easily take advantage of the Sankey tap in the dire case that there simply wasn't any homebrew available. I kicked around a number of solutions before I actually noticed a very simple one that'll work well hopefully. Note: I haven't actually received these parts and assembled the finished product yet, so this isn't a definitive solution just yet.
You can buy all of the hardware necessary to run a 5 gallon Cornelius keg with 1/4" MPT (no clue what that stands for) screw on fittings. Northern Brewer (and I'm sure others) sell a 'Tail Piece w/ 1/4" MFL' [part K027] two of which, in coordination with a two beer nuts and neoprene washers, should screw right onto the Sankey tap. If everything goes according to plan, once all of the hardware shows up and I do a little surgery, it'll be painless to swap out the Cornelius fittings for the Sankey tap. More to follow on this one. I'll post a parts list and some pictures once it's done.
It actually took a while for me to decide exactly which approach (buy and convert or build your own) to take on this endeavor, but it ultimately made sense to go with a commercial model for a couple of reasons. Firstly, it's really not all that cheap to build one yourself unless you start with a cheapo fridge or freezer. (i.e. garage sale / craigslist type material.) Secondly, the commercial guys come with the Sankey tap as an added bonus. Lastly, I was able to get a significant discount on the Danby :)
The next dilemma was how to actually set the thing up so I run Cornelius kegs the majority of the time, but could still easily take advantage of the Sankey tap in the dire case that there simply wasn't any homebrew available. I kicked around a number of solutions before I actually noticed a very simple one that'll work well hopefully. Note: I haven't actually received these parts and assembled the finished product yet, so this isn't a definitive solution just yet.
You can buy all of the hardware necessary to run a 5 gallon Cornelius keg with 1/4" MPT (no clue what that stands for) screw on fittings. Northern Brewer (and I'm sure others) sell a 'Tail Piece w/ 1/4" MFL' [part K027] two of which, in coordination with a two beer nuts and neoprene washers, should screw right onto the Sankey tap. If everything goes according to plan, once all of the hardware shows up and I do a little surgery, it'll be painless to swap out the Cornelius fittings for the Sankey tap. More to follow on this one. I'll post a parts list and some pictures once it's done.
Subscribe to:
Posts (Atom)