I think my suspicions were correct about the green apple lambic.
This past Friday was a brew day. Before moving on to the other tasks at hand (moving a Czech Pilsner to secondary - more on that later - and brewing a spiced winter ale) I sampled the lambic one last time.
It still had the scotch-like off flavor that was present about a month ago when moving it to secondary. (Boo.) Not to mention the fact that it looked like something was growing near the surface of the secondary after a week or so. I intended to take some pictures of it, but every time I moved the fermentor to get better light, it'd shake the crap off of the surface again...
So, ultimately I'm still a bit unsure that the batch was totally spoiled, but I guess it's better to be safe with this stuff.
Tack one up to catastrophic failure. I think that makes it Jordan 11 (or so) - beer 2.
Monday, November 26, 2007


Cider Experiment - 2
Sooo..... I dumped the cider a few weeks back.
This was a couple of weeks prior to converting the kegerator over to run two kegs at the same time. I just got tired of having to switch the disconnects over and run beer through the lines to get clean flavors. So that was the end of that batch. Oh well. Failure #1.
This was a couple of weeks prior to converting the kegerator over to run two kegs at the same time. I just got tired of having to switch the disconnects over and run beer through the lines to get clean flavors. So that was the end of that batch. Oh well. Failure #1.
Wednesday, October 17, 2007
Cider Experiment
I've got a batch of cider on tap in the kegerator right now which finished fermentation about a week ago.
Here's the recipe I followed:
5 Gallons of pasteurized, unfiltered cider
Wyeast Cider Yeast [Northern Brewer Y4766]
Wyeast Nutrient [Northern Brewer 9043]
It definitely did not turn out like your typical commercial cider. The yeast is way more dominant of a flavor than it should be and the sweetness you normally get isn't quite present.
That said, the end result isn't unpleasant. I also haven't ever tried any of the high-end fancy schmancy ciders, so I don't honestly know if this is closer to that style or it's just crap.
I think if I were to try this again, I'd probably eliminate the yeast nutrient or try a different strain of yeast. (Or get a bit more guidance on how this is actually supposed to be done first.)
Green Apple Lambic - 4
I moved the green apple lambic to secondary fermentation today. I can't say that I'm sure this batch is going to turn out well at all. I think that I may have left it on the yeast (primary) for too long - there are some pretty weird off-flavors that I caught when I tasted it today. (It had some good flavors, but an almost scotch-like note on the finish. Not so good.)
So, we'll see how it turns out after a month or so of conditioning. If it stays bad, this might be the first officially bad batch of homebrew I've made so far. (It's gotta happen at some point, right?)
So, we'll see how it turns out after a month or so of conditioning. If it stays bad, this might be the first officially bad batch of homebrew I've made so far. (It's gotta happen at some point, right?)
Saturday, September 22, 2007
Force Carbonating Homebrew
2011-10-17 Update
In the four years since I originally published this post, my methods have gotten a tad more *ahem* sophisticated. There's actually a proper way to carbonate your brew which will result in the desired level of CO2 for the particular style you've brewed.
First, you'll want to find the desired level of CO2 for the style you've just painstakingly brewed. Here are some general guidelines and a helpful calculator. After you've racked into your sanitized and pressure-tested keg, hook up the CO2 disconnect and dial the pressure on your regulator to the one indicated on the calculator. Leave the keg on the CO2 for 24-48 hours, gently rocking it back and forth occasionally if you're inclined to speed the process up a bit. Bleed the pressure in your keg and dial it back down to your dispensing pressure.
The method I recommended below can still work in a pinch, but there's a good chance you'll decrease the head retention of your beer by using it.
*(In case you were wondering why temperature matters, CO2 and all gasses are more soluble in liquids when they're at a lower temperature. To get really nerdy: the molecules in a liquid move around faster at higher temperature. This motion is the result of increased kinetic energy and is sufficient to break the weak bonds holding that gas in solution.)
Original Post:
So as I previously mentioned, one of the things that ultimately pushed me over the edge into procuring a kegerator was the fact that I had a batch of double IPA which failed to carbonate itself when bottled. (I had so much time invested in this brew that I couldn't bear to let it go to waste.)
Naturally, the first thing that I did once I'd completed the kegerator conversion was to force-carbonate the double IPA. And seeing as I'd already waited a really long time to try this beer, I opted for the "High Pressure and Brute Force" methodology of carbonation. In other words:
Next time I'll probably opt for natural carbonation in the cornelius keg (a la bottle conditioning) or for the "Low and Slow" method of applying dispensing pressure over about a week or two.
In the four years since I originally published this post, my methods have gotten a tad more *ahem* sophisticated. There's actually a proper way to carbonate your brew which will result in the desired level of CO2 for the particular style you've brewed.
First, you'll want to find the desired level of CO2 for the style you've just painstakingly brewed. Here are some general guidelines and a helpful calculator. After you've racked into your sanitized and pressure-tested keg, hook up the CO2 disconnect and dial the pressure on your regulator to the one indicated on the calculator. Leave the keg on the CO2 for 24-48 hours, gently rocking it back and forth occasionally if you're inclined to speed the process up a bit. Bleed the pressure in your keg and dial it back down to your dispensing pressure.
The method I recommended below can still work in a pinch, but there's a good chance you'll decrease the head retention of your beer by using it.
*(In case you were wondering why temperature matters, CO2 and all gasses are more soluble in liquids when they're at a lower temperature. To get really nerdy: the molecules in a liquid move around faster at higher temperature. This motion is the result of increased kinetic energy and is sufficient to break the weak bonds holding that gas in solution.)
Original Post:
So as I previously mentioned, one of the things that ultimately pushed me over the edge into procuring a kegerator was the fact that I had a batch of double IPA which failed to carbonate itself when bottled. (I had so much time invested in this brew that I couldn't bear to let it go to waste.)
Naturally, the first thing that I did once I'd completed the kegerator conversion was to force-carbonate the double IPA. And seeing as I'd already waited a really long time to try this beer, I opted for the "High Pressure and Brute Force" methodology of carbonation. In other words:
- chill the beer
- apply about 20-30 psi to the cornelius keg with only the gas disconnect attached
- shake the crap out of the keg
- put back in the fridge
- repeat a few times
Next time I'll probably opt for natural carbonation in the cornelius keg (a la bottle conditioning) or for the "Low and Slow" method of applying dispensing pressure over about a week or two.
Thursday, September 20, 2007
How I converted a Danby DKC645BLS to work with both Cornelius and Sankey kegs
The parts I needed to complete my kegerator arrived last night and I wasted very little time before getting down to work. (I've had a batch of Imperial IPA which failed to produce any natural carbonation during bottle conditioning which I wanted to have on tap for the Bears game this Sunday.)
Thankfully, after doing my research, it turned out to be a relatively quick project to modify the stock equipment which comes with the Danby so it'll easily switch back and forth between Cornelius and Sankey kegs.
Here's the parts list (with part numbers from Northern Brewer - no commercial affiliation - I've just had great luck with them.)
3/15/2012 Update: They're now selling everything in a single kit!
| 1x | Ball Lock 1/4" MFL Gas Disconnect | [K010] |
| 1x | Ball Lock 1/4" MFL Liquid Disconnect | [K011] |
| 1x | 5/16" Barbed Swivel Nut | [K163] |
| 1x | 1/4" Barbed Swivel Nut | [K123] |
| 2x | Tail Piece 1/4" MFL | [K027] |
| 3x | SS Worm Gear Clamp | [K124] |
| 1x | Teflon Tape | [K089] |
| 1x | Petrol Gel Lubricant | [K031] |
| Optional / Unused | ||
| 15x | 5/16" Beverage Tubing | [K201] |
| (To move CO2 tank off of the fridge) | ||
| 2x | Neoprene Beer Washers | [K030] |
| 1x | Gas Leak Detector | [K224] |
- Let's take a look at exactly what came with the kit. The CO2 cylinder and regulator will work as provided. However, the adapters on the Sankey tap and the adapter on the beer line which feeds the tower need to be changed.
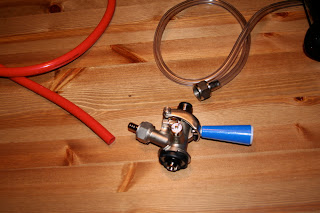
- Cut the line coming out of the tower just after the permanent tubing clamp which attaches to the Sankey tap, preserving as much of the original line as possible. Fit that line with both a hose clamp [slide on to the tubing before shoving the barb in] and the 1/4" barbed disconnect.
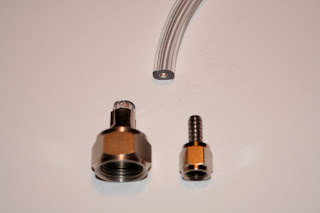
- Similarly, we'll put a hose clamp on either end of the gas line, attach one end to CO2 regulator and the other to the 5/16" barbed disconnect. Be sure to tighten the hose clamps as tightly as you can without breaking them.
- Next up, we'll modify the Sankey Tap to work with the new smaller disconnects. Here's a before picture of the tap. You can see that both the gas and liquid sides use standard beer nuts.
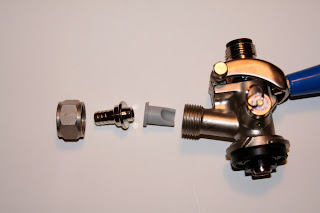
- So, we'll use the beer nuts which came with the tap and just swap out the fittings for the two 1/4" MFL tail pieces. I ordered the neoprene washers to fit between the tap and the tail pieces, but it didn't appear necessary to use them. Here's an exploded picture of the tap before re-assembly.

- That's it as far as surgery goes, so all you have to do now is decide whether you're going to drink a commercial keg or a homebrew keg. Be sure to wrap the 1/4" MFL fittings on either the Cornelius disconnects or on either end of the Sankey tap with teflon tape or use the two flared nylon washers when attaching a keg.
- Here's a picture of the conversion with disconnects side by side:

- Drink some beer!


Monday, September 17, 2007
Green Apple Lambic - 3
So, less than 24 hours after adding all of the green apple bits I could stuff into the fermentor, the fermenting beer managed to bubble up through the airlock. I guess green apples have plenty of fermentable sugars in 'em...
Subscribe to:
Posts (Atom)