In a moment of zeal about a month after I'd completed my kegerator conversion and actually had more than one Cornelius keg of brew up, I ordered a 2 port CO2 distributor (K242) and foam-free tubing kit (KX05) from Northern Brewer.
About a week later, I got a chance to install them both into the kegerator so it was possible to run two kegs at the same time, albeit only one through the faucet. (It's easier to keep the good stuff hidden from the room-mates that way.) However, I noticed that after I'd made these changes, even with both valves on the CO2 distributor closed, there was still a faint hissing from the CO2 regulator. So I got in the habit of just shutting the main valve on the regulator off as a precaution.
Fast forward to this past Saturday...
I'd kegged up my Czech Pilsner over the week and added some priming sugar to carbonate it. Unfortunately, I was starting to get a bit antsy to drink the brew since all of the tastings along the way had been very promising. So in my impatience, I dialed up the pressure on the CO2 regulator and left it to force-carbonate overnight.
And by the time I woke up on Sunday, all of the CO2 in my 5lb. tank had escaped. (In hindsight, this seems even dumber than it seemed at the time.)
So, I'll be posting a review about how well the commercial leak-detector stuff works at some point this weekend...
Wednesday, December 19, 2007
Monday, November 26, 2007
Green Apple Lambic - 5
I think my suspicions were correct about the green apple lambic.
This past Friday was a brew day. Before moving on to the other tasks at hand (moving a Czech Pilsner to secondary - more on that later - and brewing a spiced winter ale) I sampled the lambic one last time.
It still had the scotch-like off flavor that was present about a month ago when moving it to secondary. (Boo.) Not to mention the fact that it looked like something was growing near the surface of the secondary after a week or so. I intended to take some pictures of it, but every time I moved the fermentor to get better light, it'd shake the crap off of the surface again...
So, ultimately I'm still a bit unsure that the batch was totally spoiled, but I guess it's better to be safe with this stuff.
Tack one up to catastrophic failure. I think that makes it Jordan 11 (or so) - beer 2.
Cider Experiment - 2
Sooo..... I dumped the cider a few weeks back.
This was a couple of weeks prior to converting the kegerator over to run two kegs at the same time. I just got tired of having to switch the disconnects over and run beer through the lines to get clean flavors. So that was the end of that batch. Oh well. Failure #1.
This was a couple of weeks prior to converting the kegerator over to run two kegs at the same time. I just got tired of having to switch the disconnects over and run beer through the lines to get clean flavors. So that was the end of that batch. Oh well. Failure #1.
Wednesday, October 17, 2007
Cider Experiment
I've got a batch of cider on tap in the kegerator right now which finished fermentation about a week ago.
Here's the recipe I followed:
5 Gallons of pasteurized, unfiltered cider
Wyeast Cider Yeast [Northern Brewer Y4766]
Wyeast Nutrient [Northern Brewer 9043]
It definitely did not turn out like your typical commercial cider. The yeast is way more dominant of a flavor than it should be and the sweetness you normally get isn't quite present.
That said, the end result isn't unpleasant. I also haven't ever tried any of the high-end fancy schmancy ciders, so I don't honestly know if this is closer to that style or it's just crap.
I think if I were to try this again, I'd probably eliminate the yeast nutrient or try a different strain of yeast. (Or get a bit more guidance on how this is actually supposed to be done first.)
Green Apple Lambic - 4
I moved the green apple lambic to secondary fermentation today. I can't say that I'm sure this batch is going to turn out well at all. I think that I may have left it on the yeast (primary) for too long - there are some pretty weird off-flavors that I caught when I tasted it today. (It had some good flavors, but an almost scotch-like note on the finish. Not so good.)
So, we'll see how it turns out after a month or so of conditioning. If it stays bad, this might be the first officially bad batch of homebrew I've made so far. (It's gotta happen at some point, right?)
So, we'll see how it turns out after a month or so of conditioning. If it stays bad, this might be the first officially bad batch of homebrew I've made so far. (It's gotta happen at some point, right?)
Saturday, September 22, 2007
Force Carbonating Homebrew
2011-10-17 Update
In the four years since I originally published this post, my methods have gotten a tad more *ahem* sophisticated. There's actually a proper way to carbonate your brew which will result in the desired level of CO2 for the particular style you've brewed.
First, you'll want to find the desired level of CO2 for the style you've just painstakingly brewed. Here are some general guidelines and a helpful calculator. After you've racked into your sanitized and pressure-tested keg, hook up the CO2 disconnect and dial the pressure on your regulator to the one indicated on the calculator. Leave the keg on the CO2 for 24-48 hours, gently rocking it back and forth occasionally if you're inclined to speed the process up a bit. Bleed the pressure in your keg and dial it back down to your dispensing pressure.
The method I recommended below can still work in a pinch, but there's a good chance you'll decrease the head retention of your beer by using it.
*(In case you were wondering why temperature matters, CO2 and all gasses are more soluble in liquids when they're at a lower temperature. To get really nerdy: the molecules in a liquid move around faster at higher temperature. This motion is the result of increased kinetic energy and is sufficient to break the weak bonds holding that gas in solution.)
Original Post:
So as I previously mentioned, one of the things that ultimately pushed me over the edge into procuring a kegerator was the fact that I had a batch of double IPA which failed to carbonate itself when bottled. (I had so much time invested in this brew that I couldn't bear to let it go to waste.)
Naturally, the first thing that I did once I'd completed the kegerator conversion was to force-carbonate the double IPA. And seeing as I'd already waited a really long time to try this beer, I opted for the "High Pressure and Brute Force" methodology of carbonation. In other words:
Next time I'll probably opt for natural carbonation in the cornelius keg (a la bottle conditioning) or for the "Low and Slow" method of applying dispensing pressure over about a week or two.
In the four years since I originally published this post, my methods have gotten a tad more *ahem* sophisticated. There's actually a proper way to carbonate your brew which will result in the desired level of CO2 for the particular style you've brewed.
First, you'll want to find the desired level of CO2 for the style you've just painstakingly brewed. Here are some general guidelines and a helpful calculator. After you've racked into your sanitized and pressure-tested keg, hook up the CO2 disconnect and dial the pressure on your regulator to the one indicated on the calculator. Leave the keg on the CO2 for 24-48 hours, gently rocking it back and forth occasionally if you're inclined to speed the process up a bit. Bleed the pressure in your keg and dial it back down to your dispensing pressure.
The method I recommended below can still work in a pinch, but there's a good chance you'll decrease the head retention of your beer by using it.
*(In case you were wondering why temperature matters, CO2 and all gasses are more soluble in liquids when they're at a lower temperature. To get really nerdy: the molecules in a liquid move around faster at higher temperature. This motion is the result of increased kinetic energy and is sufficient to break the weak bonds holding that gas in solution.)
Original Post:
So as I previously mentioned, one of the things that ultimately pushed me over the edge into procuring a kegerator was the fact that I had a batch of double IPA which failed to carbonate itself when bottled. (I had so much time invested in this brew that I couldn't bear to let it go to waste.)
Naturally, the first thing that I did once I'd completed the kegerator conversion was to force-carbonate the double IPA. And seeing as I'd already waited a really long time to try this beer, I opted for the "High Pressure and Brute Force" methodology of carbonation. In other words:
- chill the beer
- apply about 20-30 psi to the cornelius keg with only the gas disconnect attached
- shake the crap out of the keg
- put back in the fridge
- repeat a few times
Next time I'll probably opt for natural carbonation in the cornelius keg (a la bottle conditioning) or for the "Low and Slow" method of applying dispensing pressure over about a week or two.
Thursday, September 20, 2007
How I converted a Danby DKC645BLS to work with both Cornelius and Sankey kegs
The parts I needed to complete my kegerator arrived last night and I wasted very little time before getting down to work. (I've had a batch of Imperial IPA which failed to produce any natural carbonation during bottle conditioning which I wanted to have on tap for the Bears game this Sunday.)
Thankfully, after doing my research, it turned out to be a relatively quick project to modify the stock equipment which comes with the Danby so it'll easily switch back and forth between Cornelius and Sankey kegs.
Here's the parts list (with part numbers from Northern Brewer - no commercial affiliation - I've just had great luck with them.)
3/15/2012 Update: They're now selling everything in a single kit!
| 1x | Ball Lock 1/4" MFL Gas Disconnect | [K010] |
| 1x | Ball Lock 1/4" MFL Liquid Disconnect | [K011] |
| 1x | 5/16" Barbed Swivel Nut | [K163] |
| 1x | 1/4" Barbed Swivel Nut | [K123] |
| 2x | Tail Piece 1/4" MFL | [K027] |
| 3x | SS Worm Gear Clamp | [K124] |
| 1x | Teflon Tape | [K089] |
| 1x | Petrol Gel Lubricant | [K031] |
| Optional / Unused | ||
| 15x | 5/16" Beverage Tubing | [K201] |
| (To move CO2 tank off of the fridge) | ||
| 2x | Neoprene Beer Washers | [K030] |
| 1x | Gas Leak Detector | [K224] |
- Let's take a look at exactly what came with the kit. The CO2 cylinder and regulator will work as provided. However, the adapters on the Sankey tap and the adapter on the beer line which feeds the tower need to be changed.
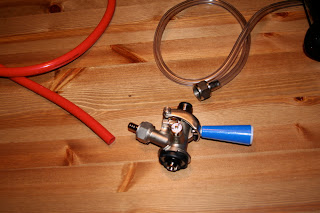
- Cut the line coming out of the tower just after the permanent tubing clamp which attaches to the Sankey tap, preserving as much of the original line as possible. Fit that line with both a hose clamp [slide on to the tubing before shoving the barb in] and the 1/4" barbed disconnect.
- Similarly, we'll put a hose clamp on either end of the gas line, attach one end to CO2 regulator and the other to the 5/16" barbed disconnect. Be sure to tighten the hose clamps as tightly as you can without breaking them.
- Next up, we'll modify the Sankey Tap to work with the new smaller disconnects. Here's a before picture of the tap. You can see that both the gas and liquid sides use standard beer nuts.
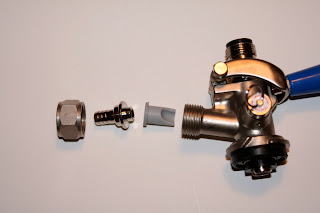
- So, we'll use the beer nuts which came with the tap and just swap out the fittings for the two 1/4" MFL tail pieces. I ordered the neoprene washers to fit between the tap and the tail pieces, but it didn't appear necessary to use them. Here's an exploded picture of the tap before re-assembly.

- That's it as far as surgery goes, so all you have to do now is decide whether you're going to drink a commercial keg or a homebrew keg. Be sure to wrap the 1/4" MFL fittings on either the Cornelius disconnects or on either end of the Sankey tap with teflon tape or use the two flared nylon washers when attaching a keg.
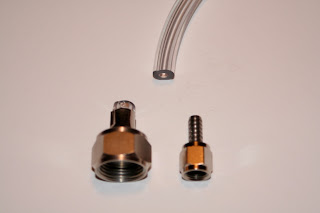
- Here's a picture of the conversion with disconnects side by side:

- Drink some beer!


Monday, September 17, 2007
Green Apple Lambic - 3
So, less than 24 hours after adding all of the green apple bits I could stuff into the fermentor, the fermenting beer managed to bubble up through the airlock. I guess green apples have plenty of fermentable sugars in 'em...
Sunday, September 16, 2007
Kegerator [part 1]
I finally made the plunge into the world of draft beer at home today. I'm now the proud new owner of a Danby half barrel kegerator. (It was a bit of a saga to actually get the damn thing since I drive a very small car, all of my room-mates drive smaller cars and my parents, whose truck I ultimately used to transport said kegerator, have a habit of leaving town whenever I actually had the free time to go pick this thing up.)
It actually took a while for me to decide exactly which approach (buy and convert or build your own) to take on this endeavor, but it ultimately made sense to go with a commercial model for a couple of reasons. Firstly, it's really not all that cheap to build one yourself unless you start with a cheapo fridge or freezer. (i.e. garage sale / craigslist type material.) Secondly, the commercial guys come with the Sankey tap as an added bonus. Lastly, I was able to get a significant discount on the Danby :)
The next dilemma was how to actually set the thing up so I run Cornelius kegs the majority of the time, but could still easily take advantage of the Sankey tap in the dire case that there simply wasn't any homebrew available. I kicked around a number of solutions before I actually noticed a very simple one that'll work well hopefully. Note: I haven't actually received these parts and assembled the finished product yet, so this isn't a definitive solution just yet.
You can buy all of the hardware necessary to run a 5 gallon Cornelius keg with 1/4" MPT (no clue what that stands for) screw on fittings. Northern Brewer (and I'm sure others) sell a 'Tail Piece w/ 1/4" MFL' [part K027] two of which, in coordination with a two beer nuts and neoprene washers, should screw right onto the Sankey tap. If everything goes according to plan, once all of the hardware shows up and I do a little surgery, it'll be painless to swap out the Cornelius fittings for the Sankey tap. More to follow on this one. I'll post a parts list and some pictures once it's done.
Green Apple Lambic - 2
It's now been about a week and a half since I started this batch. Despite some rather ominous warnings in Papazian's book about the sour mash process one uses to approximate the magical confluence of conditions in a few old Belgian breweries which produces real lambic, the wort didn't really stink all that badly or get moldy. (Which may very well mean that I did something wrong...)
However, I did add all of the green apples I could shove into the fermentor I'm using for this batch today. It kind of looks like beer sangria at this point. It'll be interesting to see how much of a secondary fermentation this kick starts.
In any case, this beer still has a long long way to go before it's even remotely drinkable. So I'll have to wait to share the outcome.
Tuesday, September 4, 2007
Green Apple Lambic
I was just up at my cousin's summer camp this past week to hang out for a few days after they shut down for the summer. Amongst other things, we cleaned out their cooler and pantry. I literally filled up the back seat of my Civic with a whole mess of commercially packaged foods, amongst which was an entire case of green apples.
Initially, I planned on making some hard cider. But once I realized that was probably out of the question because I don't own a cider press and I don't really feel like trying to extract juice from all of those apples with my brute strength, I changed my mind and decided to make a run at a green apple lambic. (For anyone who's tried Unibroue's Ephemere, you'll know exactly why that idea came to mind.)
So, I spent a bit of time researching the style and settled on a recipe that's mostly from Papazian's Joy of Homebrewing.
The brew is presently souring away while wrapped in a sleeping bag in my coat closet. I'm pretty interested to see exactly how disgusting the whole sour mash process actually is. (According to Papazian, the smell is supposedly bad enough to make you gag and want to pitch the brew...)
Sunday, January 28, 2007
On Aging Homebrew
Wow. On a whim I cracked open a bottle of Belgian Dubbel - style home-brew (a kit from NorthernBrewer) that has been sitting in a closet aging for about six months now. It was awesome.
I know that aging makes a pretty significant difference for particular types of beer, but it's always a nice reminder to actually drink the result of said aging. Some of the more subtle flavors had really come to life since I'd initially tasted this beer and other flavors had subsided...
Overall, the general flavor decently embodied what a dubbel is actually supposed to taste like - fruity, estery, high in alcohol and with a slight yeasty tang to let you know that it was bottle conditioned for six months.
Monday, January 22, 2007
Informal Reviews: Rogue American Amber Ale and Dogfish Head 90 Minute IPA
I've been scattered in my beer consumption over the past week or so and as such really haven't gone out and purchased anything with the expressed purpose of drinking it for a review.
But I have consumed a few oldies that deserve a positive mention and tasted one new beer: Dogfish Head 90 Minute IPA, Victory Prima Pils and Rogue American Amber Ale respectively.
The Rogue was actually a pleasant surprise - I was at a bar with a decent but not great selection and tried one because I'd never had it before. (I wasn't given the option to drink it out of a glass, so there really wasn't much to base a judgment of aroma on...) It was a nicely balanced, pretty easygoing beer. My snap judgement is that this stuff would make for an excellent session beer. (I'll have to follow up on that.)
90 Minute IPA and Prima Pils are both long time favorites of mine, particularly given my propensity for hops. Neither one gets worse with a broader palate to judge on - they continue to really hold their ground as excellent examples of their styles. (American Double IPA and Pilsner respectively.)
Tuesday, January 16, 2007
Review: Pyramid Thunderhead IPA

For lack of a better option, I stopped at neighborhood (albeit lackluster) liquor store on the way home. I picked up a six of Pyramid's Thunderhead IPA, which I've had on occasion before, but hadn't yet reviewed. Pyramid is a macro-micro, so their product is usually decent but not extraordinary or really innovative.
Appearance - Pours a rich copper with a solid finger of thick white head. The head retains moderately and laces lightly down the sides of the glass.
Smell - Aroma on this one is purely from the hop department with notes of grapefruit or other citrus at first while the head is still heavy. As the head dissipates, the hop aroma subsides and shares some of the nose with the sweeter honey notes from the malt.
Mouth feel - Rolls around in the mouth and fizzes away happily. This beer is more heavily carbonated or less viscous than some of the other IPA's I've had recently.
Taste - Although the nose is predominantly hop, the first flavor that hits my tongue is a caramel / honey note from the malt, but you can feel the liveliness and a touch of heat from the alcohol immediately. The flavor moves on to finish out with a balance of grapefruit peel and residual sweetness from the malt.
Drinkability - This is definitely a session IPA. Despite the fact that it doesn't blow me away, it's got the characteristics of a solid IPA without being overwhelming. In particular, it doesn't finish with a uniformly hoppy note and leave your mouth too puckered to drink more than one.
Most of the other reviews I've seen of this beer are mixed - it seems like people enjoy it to a moderate degree or don't. At $7 a six pack, I don't think you can really go too wrong with it. It's not as good as some of the other Pacific Northwest's IPA's, but seeing as I'm in Chicago and can't get my hands on Bridgeport very easily, it works.
Monday, January 15, 2007
Location: West Lakeview Liquors
Oh do I miss this particular little liquor (beer really) store.
When I lived down in Roscoe Village, this place was about a block and a half from my apartment. It's just a small storefront shop, but they manage to cram a huge selection of constantly rotating beers in. I think I probably discovered a very large percentage of what I'd now consider my favorite beers at this place by just walking in a picking something new out of the cooler.
I think it's a shame that there aren't more places out there like this that just focus on quality beer and quality booze. Especially places that have knowledgeable employees who can actually make recommendations based on styles or makers one likes.
It seems like there really aren't very many of the small specialty shops around at this point up where I live now. Everything is either a cheap-feeling convenience store that happens to stock some beer or a Binny's type location that's got a decent selection, but doesn't rotate or really carry the esoteric stuff.
In any case - if you live down in the Lakeview / Roscoe Village area, go to this place and support an outstanding local business. (I am not affiliated with these folks in any way, shape or form other than having been an extremely satisfied customer in the past.)
Saturday, January 13, 2007
Review: Dogfish Head 60 Minute IPA
Smell: The nose on this one is nearly all citrus - dominantly grapefruit aroma mixed with a pleasant amount of almost honey-like sweetness from the malt.
Appearance: Pours a nice copper with a solid white head that laces nicely and retains most of the way through the glass.
Taste: When it first hits your tongue, the flavor is dominantly citrusy and holds some of the accompanying bitterness from the hops. As the taste progresses, it takes on more flavor from the malt and finishes out with a very slightly toasted note before fading back to a nice residual hop bitterness on the palate.
Mouthfeel: As is fitting for an IPA, it rolls around just slightly heavy in the mouth.
Drinkability: The copious quantity of hops involved in this beer makes it ever so slightly too bitter to really just drink one after another after another. That said, if you drink this with some munchie type food or with a meal, it goes down really easily...
Tuesday, January 9, 2007
Review: Fat Weasel Ale
I had a bottle of this stuff sitting in my fridge and thought I'd give it another shot for the sake of doing a review...
The first time I tried it, I really wasn't impressed. Unfortunately, it really didn't redeem itself this time either.
Smell: No noticeable hop aroma, mostly just malt and alcohol on the nose. It even smells a little sweet (which is a hint of the rather unfortunate flavor to follow.)
Appearance: Light copper in color, very transparent. Pours with a thin head that dissipated quickly without any noticeable lacing
Taste: The flavor on this one is basically just indistinguishable malt and more than a bit too sweet for its own good. It finishes a little hot from the relatively high alcohol.
Mouthfeel: It's just about right. It's very middle of the road, neither very heavy nor very light.
Drinkability: This isn't a beer that I could really make my way through either of the times that I've tried it. The balance just isn't there - it finishes on the same note that the aroma suggests.
Basically, I wouldn't buy this beer unless you're planning on drinking mass quantities of cheap beer for the sole and expressed purpose of getting your buzz on. In which case, it'll do the trick a little faster than cheap macro-brewed beer and taste slightly better...
Beer Location: The Palm Tavern
I discovered this place about a year or so ago and it remains pretty much at the top of my list for places to go drink.
One of my cousins lives up in Milwaukee and bought a house in the Bayside neighborhood a couple of years ago. On one trip up there, he and I unsuccessfully tried to catch brewery tours at three of four of the local breweries and found ourselves sitting at the bar in a sushi place before they were actually open for a couple of hours.
After making our way through some of the sake selection, I noticed some Japanese beers (Hitachino - yum yum) that I'd never seen before. At some point after I'd tried a couple of them and been very impressed, the bartender recommended that we go to a bar that was actually about a block from my cousin's house. (My cousin was actually rather surprised to hear that there was a bar a block from his house.)
So after some sushi, we eventually found the Palm Tavern.
It's pretty small and nearly unidentifiable from the street. There's a tiny neon sign in the window of an otherwise totally nondescript building. But once you walk in, you realize that you've hit a goldmine. The place is pretty small and nicely appointed. It's usually not overly crowded or smoky.
They've got a beer and scotch list that's so extensive that they keep it in a binder. And John - the only bartender I've ever seen there other than the owner - knows just about every beer in the list. Everything comes in its proper glass or a glass particular to that style of beer.
According to John, the owner had some affiliation (at least I think so - it's been a while at this point) with the HopLeaf in Chicago and was inspired by it. I think he's taken the concept a step further and really focused on the beer.
Find this place if you're in Milwaukee.
Monday, January 8, 2007
Homebrew Experiment
Last weekend I had dinner at P.F. Chang's here in Chicago with a couple of friends and noticed a ginger beer on their menu that I tried mostly out of curiosity. (I asked our server about it and was almost talked out of it by her review, but decided to give it a shot anyway.)
I was truly surprised by the beer. It was relatively intense on the ginger flavor, but not overly so. It was pretty balanced and seemed to be lightly hopped (likely due to the intensity of the ginger.) In any case it was very drinkable, and makes me want to try a wheat-style based ginger beer for my next homebrew. Details to follow.
I was truly surprised by the beer. It was relatively intense on the ginger flavor, but not overly so. It was pretty balanced and seemed to be lightly hopped (likely due to the intensity of the ginger.) In any case it was very drinkable, and makes me want to try a wheat-style based ginger beer for my next homebrew. Details to follow.
First Post
Here's to a brand new blog. I'm going to attempt to write about all of my beer-related experiences and hopefully someone other than myself might find them interesting.
I'm toasting it with a Dogfish 60 minute IPA. This stuff is great. Every time that I end up at my local Binny's (for lack of a truly specialty store where I live at this point) and I don't see a new IPA, the 60 minute is one of the beers that I find myself headed back to time and time again. It's just that good.
I'm toasting it with a Dogfish 60 minute IPA. This stuff is great. Every time that I end up at my local Binny's (for lack of a truly specialty store where I live at this point) and I don't see a new IPA, the 60 minute is one of the beers that I find myself headed back to time and time again. It's just that good.
Subscribe to:
Posts (Atom)